FIXONIC
SellSavedMy Fixonic
Official iFixit API visual reference

iPhone 16 Front Camera Assembly Replacement

Use this guide to replace the front camera...

Apple iPhone 16 Moderate 45 minutes - 1 hour Guide 177394
Open the authorised source
Licensed iFixit integration

This attributed iFixit guide is displayed through Fixonic's recorded commercial API permission. iFixit remains the independent source and author of the procedure.

Guide overview

Before you begin

Use this guide to replace the front camera assembly in your iPhone 16. This assembly includes the front-facing camera and Face ID hardware. If your front-facing photos come out fuzzy, noisy, or your camera has trouble focusing, it might need to be replaced. You'll need replacement back glass adhesive to complete this repair. After your repair, calibrate authentic Apple front cameras using Repair Assistant.

Step 1

Before you begin

  • Allow your phone's battery to drain below 25%, as a charged lithium-ion battery is a potential safety hazard.
  • Unplug any cables from your phone.
  • Hold the power and either volume buttons and slide to power off your phone.
Step 2

Tape over any cracks

  • If your screen or back glass is badly cracked, lay overlapping strips of packing tape over the glass to protect yourself and make disassembly easier.
  • Make sure there's a smooth area near the bottom edge that's big enough for a suction cup to stick to.
Step 3

Remove the pentalobe screws

  • Use a P2 pentalobe driver to remove the two 7.7 mm-long screws on either side of the charging port.
Step 4

Mark your opening picks

  • If inserted too far, an opening pick can damage your device. Follow this step to mark your pick and prevent damage.
  • Measure 3 mm from the tip and mark the opening pick with a permanent marker.
  • You can also mark the other corners of the pick with different measurements.
  • Alternatively, tape a coin to a pick 3 mm from the tip.
Step 5

Heat the bottom edge

  • Use a hair dryer or heat gun to heat the bottom edge of the back glass until it's hot to the touch.
  • You can also use an iOpener to heat the back glass. Follow these instructions to heat and apply the iOpener properly.
Step 6

Insert an opening pick

  • Apply a suction handle to the bottom edge of the back glass.
  • While supporting the frame with one hand, pull up on the handle with a strong, steady force to create a gap between the back glass and the frame.
  • Insert the tip of an opening pick into the gap.
Step 7

Back glass information

  • As you slice the adhesive securing the back glass in the following steps, don't insert your pick deeper than 3 mm to avoid damaging the following areas:
  • A delicate cable connecting the back glass to the phone, right next to the volume down button. Don't insert your pick here to avoid slicing the cable.
  • Multiple spring contacts around the perimeter of the phone.
Step 8

Heat the right edge

  • Use a hair dryer or heat gun to heat the right edge of the back glass until it's hot to the touch.
Step 9

Separate the bottom right adhesive

  • Don't insert your pick deeper than 3 mm to avoid damaging the spring contacts.
  • Slide your pick around the bottom right corner and to the volume down button to separate the adhesive and release the metal clip.
  • Don't slide past the volume buttons to avoid damaging the wireless charging cable.
  • You'll hear and feel the metal clip release as you pass it.
  • Leave this pick inserted to prevent the adhesive from resealing.
Step 10

Heat the left edge

  • Use a hair dryer or heat gun to heat the left edge of the back glass until it's hot to the touch.
Step 11

Separate the left adhesive

  • Don't insert your pick deeper than 3 mm to avoid damaging the spring contacts.
  • Insert a second opening pick at the bottom edge.
  • Slide the second pick around the bottom left corner and along the left edge of the screen to separate the adhesive and release the metal clips.
  • You'll hear and feel the metal clips release as you pass them.
  • Leave this pick inserted at the top left corner to prevent the adhesive from resealing.
Step 12

Heat the top edge

  • Use a hair dryer or heat gun to heat the top edge of the back glass until it's hot to the touch.
Step 13

Separate the top right adhesive

  • Don't insert your pick deeper than 3 mm to avoid damaging the spring contacts.
  • Slide your second opening pick around the top left corner and along the top edge to separate the adhesive and release the metal clips.
  • You'll hear and feel the metal clips release as you pass them.
  • Continue sliding your pick around the top right corner until you reach the Action button.
  • Leave this pick inserted to prevent the adhesive from resealing.
Step 14

Reposition the back glass

  • At this point, the back glass should be free from the frame. If the back glass feels stuck, go back around the perimeter with your pick to check for missed sections of adhesive or stuck clips.
  • Swing open the back glass to the right of the phone to separate the remaining adhesive.
  • Support the back glass with a clean, sturdy object.
  • Remove the opening picks before continuing.
Step 15

Remove the middle connector cover screws

  • Use a tri-point Y000 driver to remove the two 1 mm‑long screws securing the middle connector cover.
Step 16

Remove the middle connector cover

  • Insert the point of a spudger in either cutout on the middle connector cover.
  • Slide the cover towards the left edge of the phone and release its hook from its slot on the logic board.
  • Remove the cover.
Step 17

Disconnect the battery

  • Use the point of a spudger to pry up and disconnect the battery press connector.
Step 18

Disconnect the wireless charging coil

  • Use the point of a spudger to pry up and disconnect the wireless charging coil press connector.
Step 19

Remove the back glass

  • Lift the back glass off the frame and remove it.
Step 20

Remove the top bracket screws

  • Use a screwdriver to remove the four screws securing the top bracket:
  • One 3.5 mm-long Phillips screw
  • Two 1.4 mm-long Phillips screws
  • One 1.0 mm-long tri-point Y000 screw
Step 21

Remove the top bracket

  • Use tweezers, or your fingers, to remove the top bracket.
Step 22

Disconnect the front camera

  • Use the point of a spudger to pry up and disconnect the two front camera press connectors.
  • The second press connector is underneath the first.
Step 23

Remove the front camera

  • Insert the point of a spudger between the top edge of the front camera and the frame.
  • Lift the front camera out of the frame and remove it.
Step 24

End of disassembly

  • Congratulations on completing disassembly! The remaining steps will show you how to reassemble your device.
  • When reconnecting press connectors, align the connector carefully over its socket and press down with your fingertip or spudger—first on one side, then the other—until it clicks into place. Don't try to force the connector into place. If you're having trouble, reposition it and try again.
Step 25

Place the front camera assembly

  • Place the front camera assembly into its recess in the frame.
Step 26

Connect the front camera assembly

  • Use the flat end of a spudger or your finger to connect the front camera's bottom press connector, then the top press connector.
Step 27

Reinstall the top bracket

  • Use tweezers, or your fingers, to reinstall the top bracket.
Step 28

Install the top bracket screws

  • Use a screwdriver to install the four screws securing the top bracket:
  • One 3.5 mm-long Phillips screw
  • Two 1.4 mm-long Phillips screws
  • One 1.0 mm-long tri-point Y000 screw
Step 29

Remove the back glass adhesive

  • Be careful not to damage any of the spring contacts as you clean the frame.
  • This is a good point to test your repair before sealing up your phone. Connect the battery and back glass, power on your phone, and make sure it works as expected. Power it back down, disconnect the battery and back glass, and continue reassembly.
  • The adhesive remaining on your phone is difficult to remove and leaves residue. If you have trouble removing the adhesive, apply some heat using a hair dryer or heat gun.
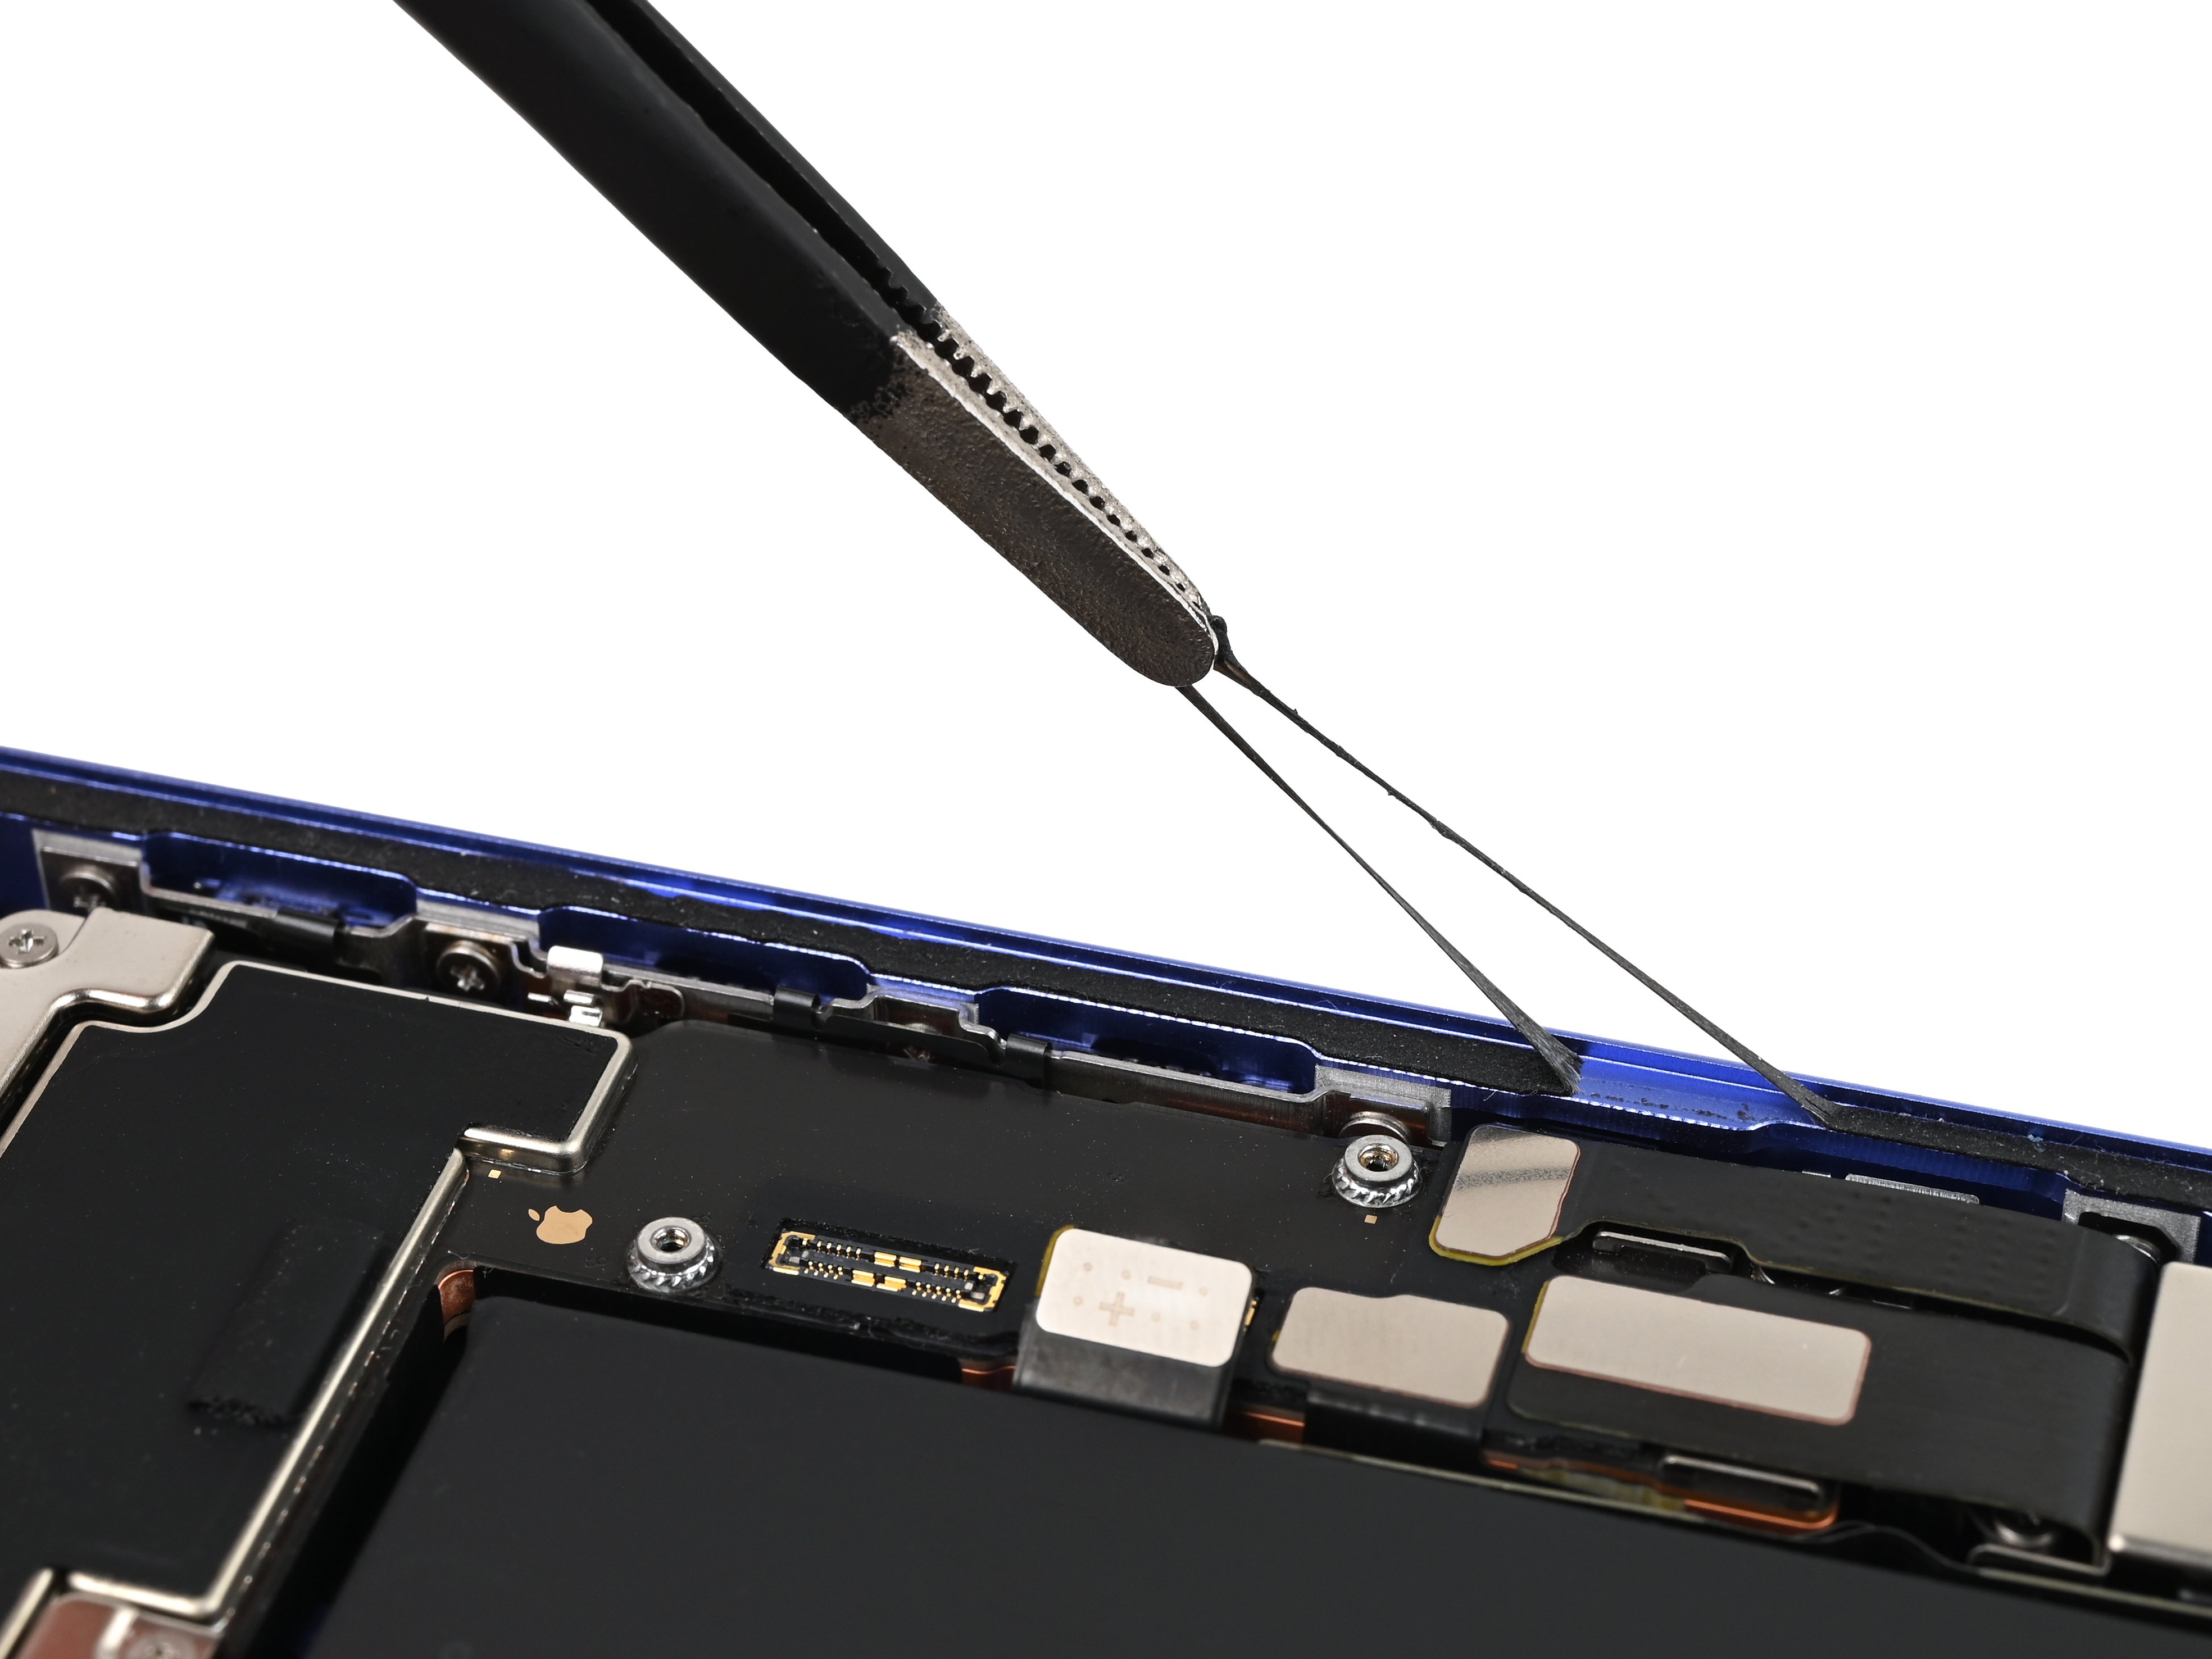
  • Use the pointed end of a spudger to press and roll the adhesive until you can grip it with a pair of tweezers.
Step 30

Repair step

  • Use the tweezers to pull the adhesive off of the phone.
  • Repeat the previous step and this step until all of the adhesive is removed.
Step 31

Clean the frame

  • Any leftover residue will compromise your iPhone's seal. Be sure to clean the frame thoroughly.
  • Wrap a microfiber or lint-free cloth over the point of a spudger and apply a few drops of high-concentration isopropyl alcohol (over 90%) to the cloth.
  • Wipe in one direction along the perimeter of the frame to clean the adhesive residue.
  • Wait a few minutes before proceeding to make sure any excess alcohol has evaporated.
Step 32

Clean the back glass

  • If you're not reusing your back glass, skip this step.
  • Apply a few drops of high-concentration isopropyl alcohol (over 90%) to a microfiber or lint-free cloth and wipe around the perimeter of the back glass to prepare the surface for new adhesive.
  • If any clips on the back glass are bent, gently straighten them with your fingers.
Step 33

Orient the adhesive

  • Orient your replacement adhesive over the frame with the larger blue liner on the underside and its pull tab in the bottom-right corner.
  • The color of your liner and the pull tab locations may be different on your adhesive.
  • Use features such as the camera cutout and notches along the edges to ensure the adhesive is oriented correctly.
Step 34

Expose the bottom edge of the adhesive

  • Use the pull tab to begin peeling the back liner off of the adhesive starting from the bottom, but do not remove the liner all the way.
Step 35

Apply the adhesive

  • Once the adhesive is pressed into place, you can't reposition it—you'll have to remove it and start over with new adhesive.
  • Hold the blue liner out of the way and align the adhesive with the bottom edge of the iPhone.
  • Lay the bottom edge of the adhesive into its recess in the frame, making sure the iPhone's spring contacts are aligned with their cutouts in the liner.
Step 36

Repair step

  • Continue peeling the back liner off of the adhesive while pressing the adhesive into place along the edges of the iPhone's frame.
  • If you correctly aligned the lower edge of the adhesive, the side and top edges will fall perfectly into place. If the adhesive is misaligned, remove it and start over with new adhesive.
  • If your adhesive is misaligned and you don't have another set handy, it's okay to temporarily put your iPhone back together and use it normally without any adhesive, but keep in mind that your iPhone's water resistance will be compromised until you install new adhesive.
Step 37

Press the adhesive into place

  • Use the flat end of a spudger to press the adhesive into place around the perimeter of the frame.
  • Be careful not to touch the spring contacts sticking through the pink liner.
Step 38

Remove the pink liner

  • Use the small pull tab in the top-right corner to remove the pink adhesive liner.
Step 39

Repair step

  • Once the top liner is removed, there should be three narrow liners on top of the adhesive with pull tabs near the bottom edge.
  • Your pull tabs may be in different positions.
  • If you don't see these pull tabs, you may have accidentally removed the thin liners in the previous step. If the adhesive is clean and properly aligned, you may proceed, just be careful not to touch anything to the exposed adhesive until you are ready to install the back glass.
Step 40

Connect the charging coil

  • Prop up the back glass along the right edge of your iPhone, using a box or similar sturdy object to support the screen.
  • Use the flat end of a spudger or your finger to connect the charging coil press connector.
Step 41

Connect the battery

  • Use the flat end of a spudger or your finger to connect the battery.
Step 42

Install the cover

  • The connector cover has two hooks that slide into slots on the logic board.
  • Lay the connector cover on the phone so the hooks are slightly to the left of their slots in the logic board.
  • Use your finger to press the connector cover down and to the right until both hooks slide into their slots.
Step 43

Install the cover screws

  • Use a tri-point Y000 driver to install the two 1 mm‑long screws securing the middle connector cover.
Step 44

Remove the final adhesive liners

  • As you remove the liners in this step, the adhesive will be fully exposed. Make sure nothing touches the exposed adhesive.
  • Use the blue tabs to remove the liners from the bottom, left, and top edges of your iPhone. Wait to remove the liner along the right edge.
Step 45

Repair step

  • Without letting the back glass touch the adhesive, hold the back glass over the phone so you can access the final liner along the right edge of the phone.
  • Use a pair of tweezers or your fingers to remove the final liner along the right edge of the phone.
Step 46

Place the back glass

  • Hold the back glass above the phone and align it with the frame.
  • Lay the glass straight down onto the frame and press until the clips engage.
  • Press around the perimeter of the back glass to engage all clips.
Step 47

Heat the back glass

  • To help the adhesive bond, apply heat to the edges of the back glass using an iOpener, hair dryer, or heat gun until it's hot to the touch.
  • Firmly press around the perimeter of the back glass.
  • If you have screen vise clamps, use them to strengthen the bond of your new adhesive. If not, keep reading for more ways to secure the back glass.
Step 48

Press the back glass

  • To evenly compress your iPhone and strengthen the bond of the back glass to the frame, you need to account for the camera bump.
  • If you have the box your iPhone came in, take the lid and place it on a flat surface.
  • If you don't have your original box, skip this step for an alternate method.
  • Place your iPhone screen-side-up in the lid of your box with the camera bump in its recess.
  • Find something close to the size of your iPhone, but taller than the sides of the box. Stack it on top of the iPhone, followed by a few heavy objects.
  • Leave the objects in place for at least thirty minutes. The lighter the objects, the longer they should be left. Ideally, leave them stacked overnight.
Step 49

Repair step

  • If you don't have the original box for your iPhone, follow the next three steps for another method to evenly compress the back glass.
  • Place the iPhone screen-side-down on a soft, flat surface.
  • Apply tape to the back glass to protect its finish.
Step 50

Repair step

  • Place two layers of coins or similarly thick objects on the tape along the edges of the back glass.
  • Evenly distribute the coins and make sure they are at least as thick as the camera bump.
Step 51

Repair step

  • Stack multiple books or other heavy objects on your iPhone.
  • The coins may leave an impression on the bottom object, so don't use anything valuable.
  • Leave the objects in place for at least thirty minutes. The lighter the objects, the longer they should be left. Ideally, leave them stacked overnight.
Step 52

Install the pentalobe screws

  • Use a P2 pentalobe driver to install the two 7.7 mm-long screws on either side of the charging port.